Cabinets and Casework
December 2001
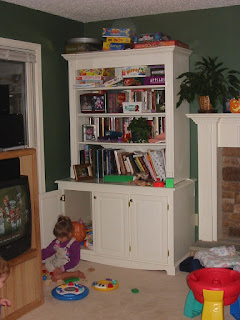
 The shelf unit and base cabinet
was a Christmas gift for friends. It took me a long time and was
actually the first piece I built after I started acquiring power tools.
The base cabinet is 48" wide by 32" high with a 43" x 48" shelf above.
The construction is pine and plywood and it was my first attempt at
raised panel doors. Per the recipient, the finish is white paint over
primer to match the house trim. By the way, the cute little kid playing
is my oldest daughter. She is an aspiring wood worker too. About 18
months later, I made one for the other side of the fireplace.
The shelf unit and base cabinet
was a Christmas gift for friends. It took me a long time and was
actually the first piece I built after I started acquiring power tools.
The base cabinet is 48" wide by 32" high with a 43" x 48" shelf above.
The construction is pine and plywood and it was my first attempt at
raised panel doors. Per the recipient, the finish is white paint over
primer to match the house trim. By the way, the cute little kid playing
is my oldest daughter. She is an aspiring wood worker too. About 18
months later, I made one for the other side of the fireplace.May 2003
 My wife wanted a microwave stand for the kitchen. The cabinet carcass is poplar and birch ply. The upper shelf support is MDF. All shelves, doors and trim is hard maple. The project is finished in white Duron Plastikote enamel for all painted surfaces. The maple trim is four coats of 2# garnet shellac. The top coats of the stained pieces is three coats of wipe on poly.
 December 2003
This piece is a small bookcase I made for my youngest brother. The piece was made out of re-cycled drawing boards. The boards are heart pine and planed down to 1" thick. I left most of the patina and defects in the boards. The finish is four coats of 2# half orange-half golden button shellac. The last coat was spay applied. The piece will be rubbed out with wax and steel wool before delivery.February 2004
 My wife wanted a nightstand to march our bedroom furniture. The material is recovered barn wood from our family property in Alabama. The finish schedule is various layer so shellac spray applied topcoated with Nitro lacquer and rubbed to a satin finish.
style is frameless to match the existing dresser and nightstands. The material is 100% white pine. Hidden structural sections are hardwood ply. All the hardware, bunn feet, and drawer slides are shopmade with the knobs purchased to match the existing. The drawers are half blind dovetailed fronts and backs with shop made hardwood runners. This was also the first project I was able to brand using the branding iron my wife gave me last Christmas.
December 2006
 This is a Small Bookcase for my friends first baby. It was designed after existing furniture in the
 baby's room. The material is hardwood plywood with maple frame, top shelf and trim. The bracket feet are solid maple in the classic style. The color is deep red wine cherry dye with four (4) coats of lacquer as the top coat.
 The piece was decorated with subtle curves to match existing furniture. The bracket feet were added to go with existing furniture.
November 2010
My wife gave away all of our AV equipment and the Entertainment center in 2008. I made this Entertainment Center to hold our TV and all of my wife's photo albums. Here it is stuffed with photos,books and albums. The piece contains several details. Some I bought and some I hand cut.
The rope and spool molding were purchased. The bracket feet, beaded and curved top rail as well as the beaded styles were hand cut.
The finish is Red Mahogany oil soluble dye top coated with Sherwin Williams 60% sheen NC lacquer.
March 2011
 My brother calls and says that he wants a TV stand for his bedroom. He has a bunch of recovered oak hard wood floor strips and scraps he wants use for the project. We built the project together over the course of about 6 weekends.
We used whatever flooring scraps we had and all the left over red oak scraps from some other project. It turned out really great for a piece made almost entirely of reclaimed wood floor and scraps. The doors and side panels are where we used the reclaimed flooring strips edge glued together then flattened in the planer. The top, face frame and base trim are left overs from previous projects that were perfect for this small TV stand. The finish is transtints liquid dye, shellac as a barrier coat then several coats of satin WB Target acrylic lacquer. Joe is the best shopmate and little brother a guy could want.
September 2012
 My wife and middle
daughter requested cabinets installed in their bathrooms. Cabinets are both white acrylic lacquer frame and doors. Doors are simple basic raised panels with adjustable shelves behind the doors.
January 2013
 My youngest and middle daughters each requested a "cubbie shelf" for them to put their clothes, books whatever in their rooms. Each were patterned after the entertainment center in the living room but
proportioned to fit and function in a bedroom. White was the requested color.
February 2014

Kitchen Island requested by my wife back in 2013. We were sorely in need of more cabinet and drawer space, so she told me what she wanted, I went to work. It felt really great that she liked it so much. Here it is. The material is red oak stained to match the existing cabinets. The finish is water based Varathane Poly. The top is 2" porcelain mosaic tile with an oak frame. The piece is supported on casters to allow it to move around. It is heavy enough that is not easy to move which is good. This piece has ended up being the hub of the house. We prepare meals from it. We serve meals buffet style from it and nosh appetizers off of it when we have guests over. There is a lot of much needed cabinet space and drawer space on both sides. It is probably the most well used piece of furniture I have ever built. The Varathane acrylic poly has really held up well.
I documented the island in my daily blog in the Kitchen Island Entry.
April 2024
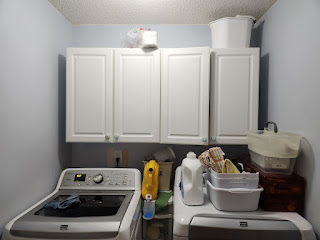
My wife requested a laundry room make over. We had installed two (2) double cabinet units years ago. The cabinets were constantly crammed with odds and ends. There wasn't any room for things we actually used.

BEFORE
The original cabinets were white MDF and a lot smaller inside than they looked. Anything larger than a bottle of detergent had to be stored in the garage. The walls were a robin egg blue with wallpaper border at the top. As seen in the "BEFORE" photo, the laundry was cluttered because anything that wouldn't fit in the cabinets was stacked on the dryer top.
We went to the local PPG paint store in search of color palate ideas. She grabbed a card with 5 different "Shades of Gray". Yeah, we made our own jokes about that.
The cabinets were painted with three coats PPG Break Through Gray Flannel satin finish. Cabinet interiors are simply clear coated with General Finishes High Performance Satin Poly. Everything was spray applied. The PPG Break Through had to be thinned between 10-15% with water to get it to flow out of my Porter Cable HVLP with a 2.2mm needle. The clears were designed for spraying, so I was able to use a 1.4mm needle with them.
The center shelves are left over 1/2" maple ply with some red oak front nosing stained dark. The rest of the shelf box frames is scrap poplar and supports the shelves from underneath. The center shelves are through bolted into the cabinet carcass and supported with 100# drywall anchors at the back.


Comments
Post a Comment